 srcmini
Kivy是Python中与平台无关的GUI工具。由于可以在Android, IOS, Linux和Windows等操作系统上运行, 因此Kivy为你提供了编写代码一次并在不同平台上运行的功能。它基本上用于开发Android应用程序, 但并不意味着它不能在桌面应用程序上使用。
??Kivy教程–通过示例学习Kivy。
现在, 在本文中, 我们将学习如何在kivy中构建按钮, 就像我们在计算器和更多地方使用的按钮一样, 如何为按钮添加功能, 按钮的样式。
的纽扣是具有相关操作的标签, 该操作在按下按钮时触发(或在单击/触摸后释放)。我们可以在按钮后面添加功能并设置按钮样式。
创建按钮时要遵循的基本方法:
-> import kivy
-> import kivy App
-> import button
-> set minimum version(optional)
-> Extend the class
-> Add and return a button
-> Run an instance of the class
代码1:如何在猕猴桃中创建按钮。
# import kivy module
import kivy

# this restrict the kivy version i.e
# below this kivy version you cannot
# use the app or software
kivy.require( "1.9.1" )

# base Class of your App inherits from the App class.
# app:always refers to the instance of your application
from kivy.app import App

# creates the button in kivy
# if not imported shows the error
from kivy.uix.button import Button

# class in which we are creating the button
class ButtonApp(App):

     def build( self ):

         btn = Button(text = "Push Me !" )
         return btn

# creating the object root for ButtonApp() class
root = ButtonApp()

# run function runs the whole program
# i.e run() method which calls the
# target function passed to the constructor.
root.run()
输出如下:
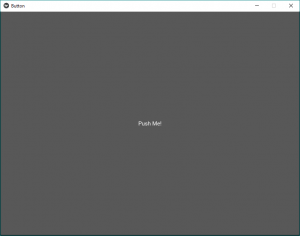
在上面的输出中, 该按钮将覆盖整个窗口, 因为我们没有给按钮指定任何特定的大小或样式, 因此默认情况下, 它显示的按钮大小等于窗口大小。
代码2:
样式按钮
def build( self ):
         # use a (r, g, b, a) tuple
         btn = Button(text = "Push Me !" , font_size = "20sp" , background_color = ( 1 , 1 , 1 , 1 ), color = ( 1 , 1 , 1 , 1 ), size = ( 32 , 32 ), size_hint = (. 2 , . 2 ), pos = ( 300 , 250 ))

         return btn
输出如下:
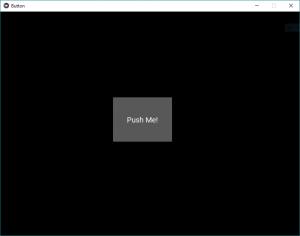
这些只是类似于HTML, CSS效果。这样, 我们就可以将按钮的位置固定在窗口的中央, 文本大小, 颜色以及你想要的任何位置。
代码#3
在按钮后面添加功能。
常见问题之一是如何向按钮添加功能。所以要添加功能, 我们使用
bind()
function它将功能绑定到按钮。 bind()创建一个发送到callback()的事件。
对于新的Kivy用户而言, 最常见的问题之一是误解bind方法的工作方式, 尤其是在尚未完全了解函数调用直觉的Python新用户中。
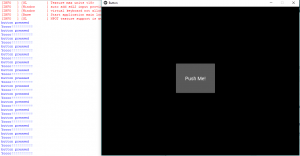
问题是bind方法不知道函数的存在或其参数, 它仅接收此函数调用的结果。就像给定代码中的那样, 当按下按钮时, 它将在函数回调中打印”按下按钮” def。
在bind()内部的给定代码中, 我们使用on_press因为当按下按钮时它告诉函数按下了按钮, 然后绑定使用了它的功能。
# import kivy module
import kivy

# this restrict the kivy version i.e
# below this kivy version you cannot
# use the app or software
kivy.require( "1.9.1" )

# base Class of your App inherits from the App class.
# app:always refers to the instance of your application
from kivy.app import App

# creates the button in kivy
# if not imported shows the error
from kivy.uix.button import Button

# class in which we are creating the button
class ButtonApp(App):

     def build( self ):
         # use a (r, g, b, a) tuple
         btn = Button(text = "Push Me !" , font_size = "20sp" , background_color = ( 1 , 1 , 1 , 1 ), color = ( 1 , 1 , 1 , 1 ), size = ( 32 , 32 ), size_hint = (. 2 , . 2 ), pos = ( 300 , 250 ))

         # bind() use to bind the button to function callback
         btn.bind(on_press = self .callback)
         return btn

     # callback function tells when button pressed
     def callback( self , event):
         print ( "button pressed" )
         print ( 'Yoooo !!!!!!!!!!!' )


# creating the object root for ButtonApp() class
root = ButtonApp()

# run function runs the whole program
# i.e run() method which calls the target
# function passed to the constructor.
root.run()
输出如下:
视频输出:
首先, 你的面试准备可通过以下方式增强你的数据结构概念:Python DS课程。
评论前必须登录!
注册