 srcmini
本文概述
什么是WordCloud?
很多时候, 你可能会看到一片云, 上面堆满了许多大小不同的单词, 这些单词代表了每个单词的出现频率或重要性。这称为标签云或词云。对于本教程, 你将学习如何在Python中创建自己的WordCloud并根据需要自定义它。该工具非常适合浏览文本数据并使报告更生动。
在本教程中, 我们将使用来自Wine Enthusiast网站的葡萄酒评论数据集来学习:
- 如何从一个到几个文本文档创建基本的wordcloud
- 调整wordcloud中文本的颜色, 大小和数量
- 将你的wordcloud遮盖成你选择的任何形状
- 将你的wordcloud遮罩成你选择的任何颜色模式

先决条件
你将需要在下面安装一些软件包:
- 麻木
- 大熊猫
- matplotlib
- 枕头
- 词云
numpy库是最流行和最有用的库之一, 用于处理多维数组和矩阵。它还可与Pandas库结合使用以执行数据分析。
Python os模块是一个内置库, 因此你无需安装它。要了解有关使用os模块处理文件的更多信息, 此srcmini教程将非常有用。
为了可视化, matplotlib是一个基本库, 使许多其他库可以在其基础上运行和绘图, 包括本教程中将使用的seaborn或wordcloud。枕头库是一个可以读取图像的软件包。它的教程可以在这里找到。 Pillow是PIL的包装-Python Imaging Library。你将需要此库来读取图像作为wordcloud的掩码。
安装wordcloud可能会有些棘手。如果只需要它来绘制基本的wordcloud, 则pip install wordcloud或conda install -c conda-forge wordcloud就足够了。但是, 具有将云遮盖成你选择的任何形状的能力的最新版本需要以下不同的安装方法:
git clone https://github.com/amueller/word_cloud.git
cd word_cloud
pip install .
资料集:
本教程使用Kaggle提供的葡萄酒评论数据集。这个集合是一个很好的学习数据集, 没有缺失值(这将花费一些时间来处理), 并且包含大量文本(葡萄酒评论), 分类和数字数据。
现在开始吧!
首先, 你加载所有必需的库:
# Start with loading all necessary libraries
import numpy as np
import pandas as pd
from os import path
from PIL import Image
from wordcloud import WordCloud, STOPWORDS, ImageColorGenerator

import matplotlib.pyplot as plt
% matplotlib inline
c:\intelpython3\lib\site-packages\matplotlib\__init__.py:
import warnings
warnings.filterwarnings("ignore")
如果你有10个以上的库, 则使用代码中的注释按部分(例如基本库, 可视化文件, 模型等)组织它们, 这将使你的代码简洁易懂。
现在, 使用pandas read_csv加载数据框。注意, 使用index_col = 0意味着我们不将行名(索引)作为单独的列读入。
# Load in the dataframe
df = pd.read_csv("data/winemag-data-130k-v2.csv", index_col=0)
# Looking at first 5 rows of the dataset
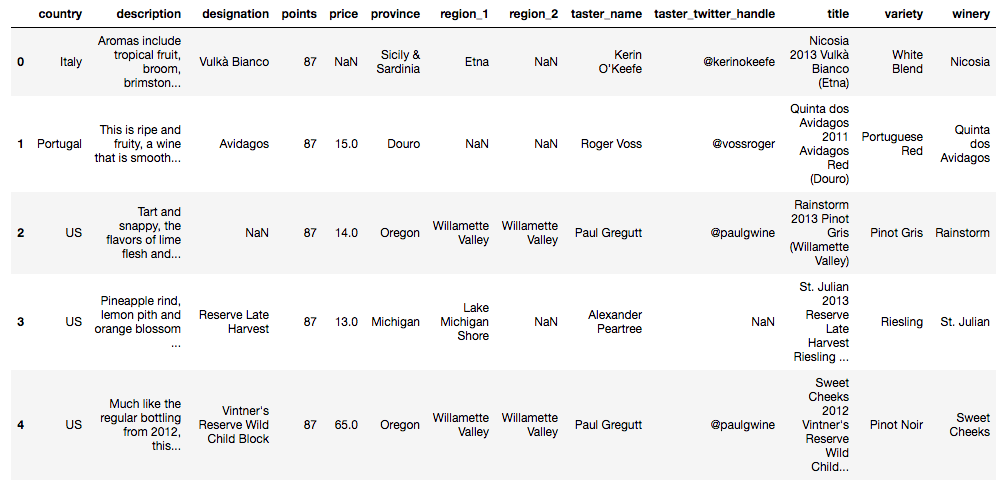
df.head()
你可以将print()与.format()结合使用以打印出有关数据集的一些基本信息, 从而获得不错的打印输出。
print("There are {} observations and {} features in this dataset. \n".format(df.shape[0], df.shape[1]))

print("There are {} types of wine in this dataset such as {}... \n".format(len(df.variety.unique()), ", ".join(df.variety.unique()[0:5])))

print("There are {} countries producing wine in this dataset such as {}... \n".format(len(df.country.unique()), ", ".join(df.country.unique()[0:5])))
There are 129971 observations and 13 features in this dataset.

There are 708 types of wine in this dataset such as White Blend, Portuguese Red, Pinot Gris, Riesling, Pinot Noir...

There are 44 countries producing wine in this dataset such as Italy, Portugal, US, Spain, France...
df[["country", "description", "points"]].head()
| 国家 | 描述 | 点数 | |
|---|---|---|---|
| 0 | 意大利 | 香气包括热带水果, 扫帚, brimston … | 87 |
| 1 | 葡萄牙 | 这是成熟果香, 柔滑的酒… | 87 |
| 2 | US | 酸和活泼, 酸橙果肉的味道和… | 87 |
| 3 | US | 菠萝皮, 柠檬髓和橙花… | 87 |
| 4 | US | 就像2012年以来的常规装瓶一样, 这… | 87 |
要在功能组之间进行比较, 可以使用groupby()并计算摘要统计信息。
使用葡萄酒数据集, 你可以按国家/地区分组并查看所有国家/地区的价格和价格的摘要统计信息, 或者选择最受欢迎和最昂贵的价格。
# Groupby by country
country = df.groupby("country")

# Summary statistic of all countries
country.describe().head()
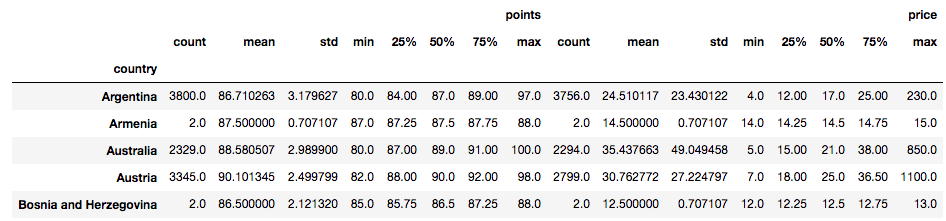
这将在所有44个国家/地区中选择前5个最高平均分:
country.mean().sort_values(by="points", ascending=False).head()
| 点数 | 价钱 | |
|---|---|---|
| 国家 | ||
| 英国 | 91.581081 | 51.681159 |
| 印度 | 90.222222 | 13.333333 |
| 奥地利 | 90.101345 | 30.762772 |
| 德国 | 89.851732 | 42.257547 |
| 加拿大 | 89.369650 | 35.712598 |
你可以使用Pandas DataFrame和Matplotlib的plot方法按国家/地区对葡萄酒数量进行绘制。如果你不熟悉Matplotlib, 建议你快速阅读本教程。
plt.figure(figsize=(15, 10))
country.size().sort_values(ascending=False).plot.bar()
plt.xticks(rotation=50)
plt.xlabel("Country of Origin")
plt.ylabel("Number of Wines")
plt.show()
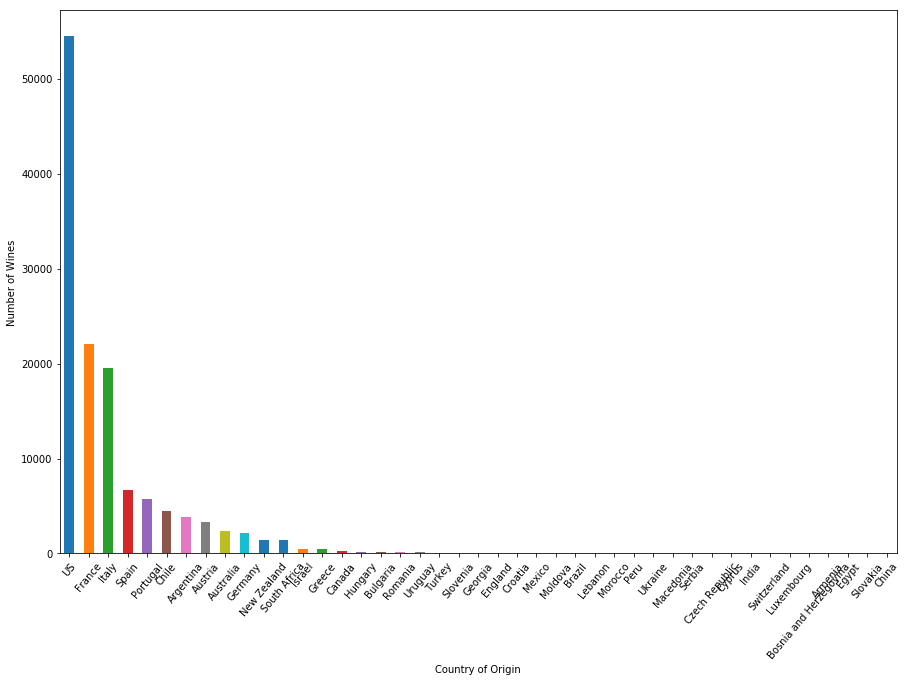
在44个生产葡萄酒的国家中, 美国的葡萄酒评论数据库中有50, 000多种葡萄酒, 是排名第二的国家的两倍:法国-以其葡萄酒而闻名的国家。意大利还生产大量优质葡萄酒, 有近20, 000种葡萄酒可供审查。
数量超过质量吗?
现在, 使用与上述相同的绘图技术, 按照评分最高的葡萄酒查看所有44个国家/地区的地块:
plt.figure(figsize=(15, 10))
country.max().sort_values(by="points", ascending=False)["points"].plot.bar()
plt.xticks(rotation=50)
plt.xlabel("Country of Origin")
plt.ylabel("Highest point of Wines")
plt.show()
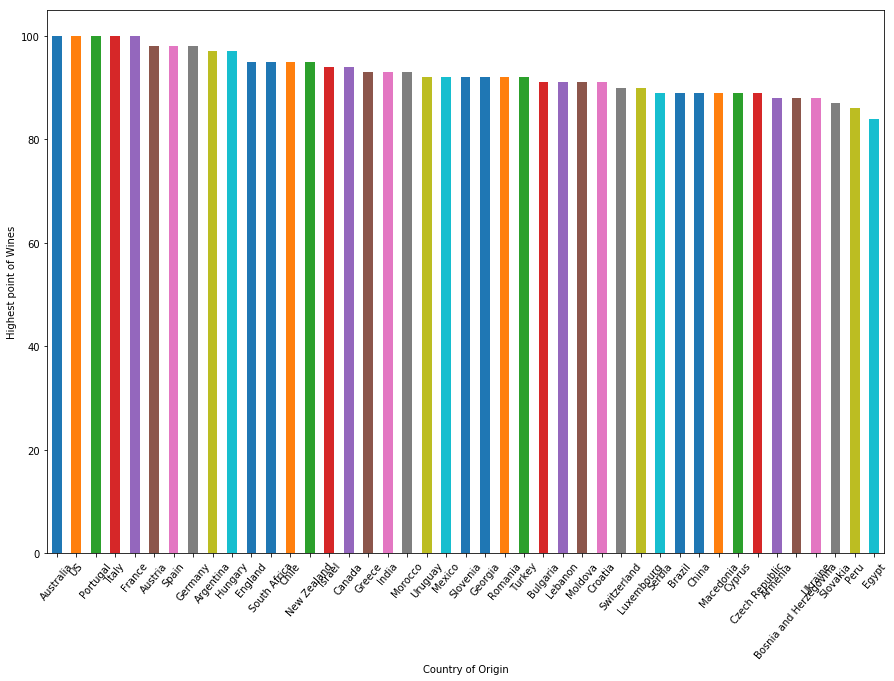
澳洲, 美国, 葡萄牙, 意大利和法国都有100分的葡萄酒。如果你注意到, 在数据集中生产的葡萄酒数量上, 葡萄牙排名第5, 澳大利亚排名第9, 这两个国家/地区的葡萄酒种类少于8000。
要了解你当前使用的数据集, 需要做一些数据探索。现在, 你将开始深入研究这顿饭的主要过程:WordCloud。
设置基本的WordCloud
WordCloud是一种显示给定文本中最常用的单词的技术。使用任何函数之前, 你可能要做的第一件事是检出函数的文档字符串, 并查看所有必需和可选参数。为此, 键入?function并运行它以获取所有信息。
?WordCloud
[1;31mInit signature:[0m [0mWordCloud[0m[1;33m([0m[0mfont_path[0m[1;33m=[0m[1;32mNone[0m[1;33m, [0m [0mwidth[0m[1;33m=[0m[1;36m400[0m[1;33m, [0m [0mheight[0m[1;33m=[0m[1;36m200[0m[1;33m, [0m [0mmargin[0m[1;33m=[0m[1;36m2[0m[1;33m, [0m [0mranks_only[0m[1;33m=[0m[1;32mNone[0m[1;33m, [0m [0mprefer_horizontal[0m[1;33m=[0m[1;36m0.9[0m[1;33m, [0m [0mmask[0m[1;33m=[0m[1;32mNone[0m[1;33m, [0m [0mscale[0m[1;33m=[0m[1;36m1[0m[1;33m, [0m [0mcolor_func[0m[1;33m=[0m[1;32mNone[0m[1;33m, [0m [0mmax_words[0m[1;33m=[0m[1;36m200[0m[1;33m, [0m [0mmin_font_size[0m[1;33m=[0m[1;36m4[0m[1;33m, [0m [0mstopwords[0m[1;33m=[0m[1;32mNone[0m[1;33m, [0m [0mrandom_state[0m[1;33m=[0m[1;32mNone[0m[1;33m, [0m [0mbackground_color[0m[1;33m=[0m[1;34m'black'[0m[1;33m, [0m [0mmax_font_size[0m[1;33m=[0m[1;32mNone[0m[1;33m, [0m [0mfont_step[0m[1;33m=[0m[1;36m1[0m[1;33m, [0m [0mmode[0m[1;33m=[0m[1;34m'RGB'[0m[1;33m, [0m [0mrelative_scaling[0m[1;33m=[0m[1;36m0.5[0m[1;33m, [0m [0mregexp[0m[1;33m=[0m[1;32mNone[0m[1;33m, [0m [0mcollocations[0m[1;33m=[0m[1;32mTrue[0m[1;33m, [0m [0mcolormap[0m[1;33m=[0m[1;32mNone[0m[1;33m, [0m [0mnormalize_plurals[0m[1;33m=[0m[1;32mTrue[0m[1;33m, [0m [0mcontour_width[0m[1;33m=[0m[1;36m0[0m[1;33m, [0m [0mcontour_color[0m[1;33m=[0m[1;34m'black'[0m[1;33m)[0m[1;33m[0m[0m
[1;31mDocstring:[0m
Word cloud object for generating and drawing.
Parameters
----------
font_path : string
Font path to the font that will be used (OTF or TTF).
Defaults to DroidSansMono path on a Linux machine. If you are on
another OS or don't have this font; you need to adjust this path.
width : int (default=400)
Width of the canvas.
height : int (default=200)
Height of the canvas.
prefer_horizontal : float (default=0.90)
The ratio of times to try horizontal fitting as opposed to vertical.
If prefer_horizontal < 1, the algorithm will try rotating the word
if it doesn't fit. (There is currently no built-in way to get only
vertical words.)
mask : nd-array or None (default=None)
If not None, gives a binary mask on where to draw words. If mask is not
None, width and height will be ignored, and the shape of mask will be
used instead. All white (#FF or #FFFFFF) entries will be considered
"masked out" while other entries will be free to draw on. [This
changed in the most recent version!]
contour_width: float (default=0)
If mask is not None and contour_width > 0, draw the mask contour.
contour_color: color value (default="black")
Mask contour color.
scale : float (default=1)
Scaling between computation and drawing. For large word-cloud images, using scale instead of larger canvas size is significantly faster, but
might lead to a coarser fit for the words.
min_font_size : int (default=4)
Smallest font size to use. Will stop when there is no more room in this
size.
font_step : int (default=1)
Step size for the font. font_step > 1 might speed up computation but
give a worse fit.
max_words : number (default=200)
The maximum number of words.
stopwords : set of strings or None
The words that will be eliminated. If None, the build-in STOPWORDS
list will be used.
background_color : color value (default="black")
Background color for the word cloud image.
max_font_size : int or None (default=None)
Maximum font size for the largest word. If None, the height of the image is
used.
mode : string (default="RGB")
Transparent background will be generated when mode is "RGBA" and
background_color is None.
relative_scaling : float (default=.5)
Importance of relative word frequencies for font-size. With
relative_scaling=0, only word-ranks are considered. With
relative_scaling=1, a word that is twice as frequent will have twice
the size. If you want to consider the word frequencies and not only
their rank, relative_scaling around .5 often looks good.
.. versionchanged: 2.0
Default is now 0.5.
color_func : callable, default=None
Callable with parameters word, font_size, position, orientation, font_path, random_state that returns a PIL color for each word.
Overwrites "colormap".
See colormap for specifying a matplotlib colormap instead.
regexp : string or None (optional)
Regular expression to split the input text into tokens in process_text.
If None is specified, ``r"\w[\w']+"`` is used.
collocations : bool, default=True
Whether to include collocations (bigrams) of two words.
.. versionadded: 2.0
colormap : string or matplotlib colormap, default="viridis"
Matplotlib colormap to randomly draw colors from for each word.
Ignored if "color_func" is specified.
.. versionadded: 2.0
normalize_plurals : bool, default=True
Whether to remove trailing 's' from words. If True and a word
appears with and without a trailing 's', the one with trailing 's'
is removed and its counts are added to the version without
trailing 's' -- unless the word ends with 'ss'.
Attributes
----------
``words_`` : dict of string to float
Word tokens with associated frequency.
.. versionchanged: 2.0
``words_`` is now a dictionary
``layout_`` : list of tuples (string, int, (int, int), int, color))
Encodes the fitted word cloud. Encodes for each word the string, font
size, position, orientation, and color.
Notes
-----
Larger canvases will make the code significantly slower. If you need a
large word cloud, try a lower canvas size, and set the scale parameter.
The algorithm might give more weight to the ranking of the words
then their actual frequencies, depending on the ``max_font_size`` and the
scaling heuristic.
[1;31mFile:[0m c:\intelpython3\lib\site-packages\wordcloud\wordcloud.py
[1;31mType:[0m type
你可以看到, WordCloud对象唯一需要的参数是文本, 而所有其他参数都是可选的。
因此, 让我们从一个简单的示例开始:使用第一个观察描述作为wordcloud的输入。三个步骤是:
- 提取评论(文本文件)
- 创建并生成wordcloud图像
- 使用matplotlib显示云
# Start with one review:
text = df.description[0]

# Create and generate a word cloud image:
wordcloud = WordCloud().generate(text)

# Display the generated image:
plt.imshow(wordcloud, interpolation='bilinear')
plt.axis("off")
plt.show()
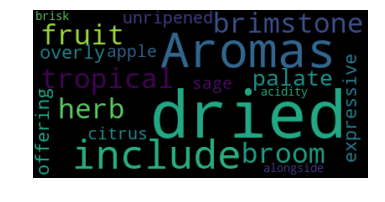
大!你可以看到第一篇评论提到了很多关于干味和葡萄酒的香气。
现在, 更改WordCloud的一些可选参数, 例如max_font_size, max_word和background_color。
# lower max_font_size, change the maximum number of word and lighten the background:
wordcloud = WordCloud(max_font_size=50, max_words=100, background_color="white").generate(text)
plt.figure()
plt.imshow(wordcloud, interpolation="bilinear")
plt.axis("off")
plt.show()
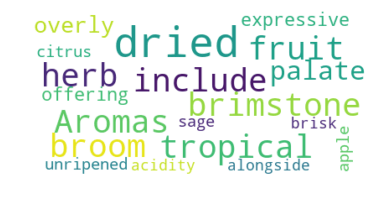
gh, 看来max_font_size可能不是一个好主意。这使得查看单词频率之间的差异变得更加困难。但是, 增亮背景会使云更容易阅读。
如果要保存图像, WordCloud提供了to_file函数
# Save the image in the img folder:
wordcloud.to_file("img/first_review.png")
<wordcloud.wordcloud.WordCloud at 0x16f1d704978>
将它们加载到其中时, 结果将如下所示:

你可能已经注意到plt.imshow()中的参数插值=” bilinear”。这是为了使显示的图像看起来更平滑。有关该选择的更多信息, 这是一个有用的链接, 以探索有关此选择的更多信息。
因此, 现在你将所有葡萄酒评论合并为一个大文本, 并创建一个巨大的胖云, 以查看这些葡萄酒中最常见的特征。
text = " ".join(review for review in df.description)
print ("There are {} words in the combination of all review.".format(len(text)))
There are 31661073 words in the combination of all review.
# Create stopword list:
stopwords = set(STOPWORDS)
stopwords.update(["drink", "now", "wine", "flavor", "flavors"])

# Generate a word cloud image
wordcloud = WordCloud(stopwords=stopwords, background_color="white").generate(text)

# Display the generated image:
# the matplotlib way:
plt.imshow(wordcloud, interpolation='bilinear')
plt.axis("off")
plt.show()
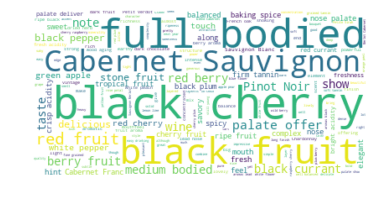
哦, 似乎黑樱桃和浓郁的醇厚是最受欢迎的特征, 而赤霞珠则是最受欢迎的特征。这与赤霞珠”是世界上最知名的红酒葡萄品种之一。从加拿大的欧肯娜根谷到黎巴嫩的贝卡谷地等几乎所有主要葡萄酒生产国中都有出产的事实相吻合。” [1 ]
现在, 让我们将这些词倒入一杯葡萄酒中!
说真的
如果你愿意, 甚至一瓶酒!
为了为你的wordcloud创建形状, 首先, 你需要找到一个PNG文件作为遮罩。以下是一个不错的网站, 可以在互联网上找到它:

并非所有的蒙版图像都具有相同的格式, 从而导致不同的结果, 因此使WordCloud功能无法正常工作。为了确保你的遮罩能够正常工作, 让我们以numpy数组形式看一下它:
wine_mask = np.array(Image.open("img/wine_mask.png"))
wine_mask
array([[0, 0, 0, ..., 0, 0, 0], [0, 0, 0, ..., 0, 0, 0], [0, 0, 0, ..., 0, 0, 0], ..., [0, 0, 0, ..., 0, 0, 0], [0, 0, 0, ..., 0, 0, 0], [0, 0, 0, ..., 0, 0, 0]], dtype=uint8)
遮罩功能的工作方式是要求遮罩的所有白色部分应为255而不是0(整数类型)。该值表示像素的”强度”。值255为纯白色, 而值1为黑色。在这里, 如果你的遮罩与上述格式相同, 则可以使用下面提供的功能来转换遮罩。请注意, 如果你的蒙版的背景不是0, 而是1或2, 请调整功能以匹配蒙版。
首先, 使用transform_format()函数将数字0交换为255。
def transform_format(val):
    if val == 0:
        return 255
    else:
        return val
然后, 创建一个形状与你现有的蒙版相同的新蒙版, 并将函数transform_format()应用于上一个蒙版的每一行中的每个值。
# Transform your mask into a new one that will work with the function:
transformed_wine_mask = np.ndarray((wine_mask.shape[0], wine_mask.shape[1]), np.int32)

for i in range(len(wine_mask)):
    transformed_wine_mask[i] = list(map(transform_format, wine_mask[i]))
现在, 你将以正确的形式创建一个新的蒙版。打印出转换后的遮罩是检查功能是否正常的最佳方法。
# Check the expected result of your mask
transformed_wine_mask
array([[255, 255, 255, ..., 255, 255, 255], [255, 255, 255, ..., 255, 255, 255], [255, 255, 255, ..., 255, 255, 255], ..., [255, 255, 255, ..., 255, 255, 255], [255, 255, 255, ..., 255, 255, 255], [255, 255, 255, ..., 255, 255, 255]])
好的!使用正确的蒙版, 你可以开始使用选定的形状制作wordcloud。请注意, WordCloud函数中有一个mask参数, 该参数接受你在上面创建的转换后的遮罩。顾名思义, contour_width和contour_color是用于调整云的轮廓特征的参数。这里的酒瓶是红酒瓶, 所以耐火砖似乎是轮廓颜色的不错选择。如需更多颜色选择, 请查看此颜色代码表
# Create a word cloud image
wc = WordCloud(background_color="white", max_words=1000, mask=transformed_wine_mask, stopwords=stopwords, contour_width=3, contour_color='firebrick')

# Generate a wordcloud
wc.generate(text)

# store to file
wc.to_file("img/wine.png")

# show
plt.figure(figsize=[20, 10])
plt.imshow(wc, interpolation='bilinear')
plt.axis("off")
plt.show()

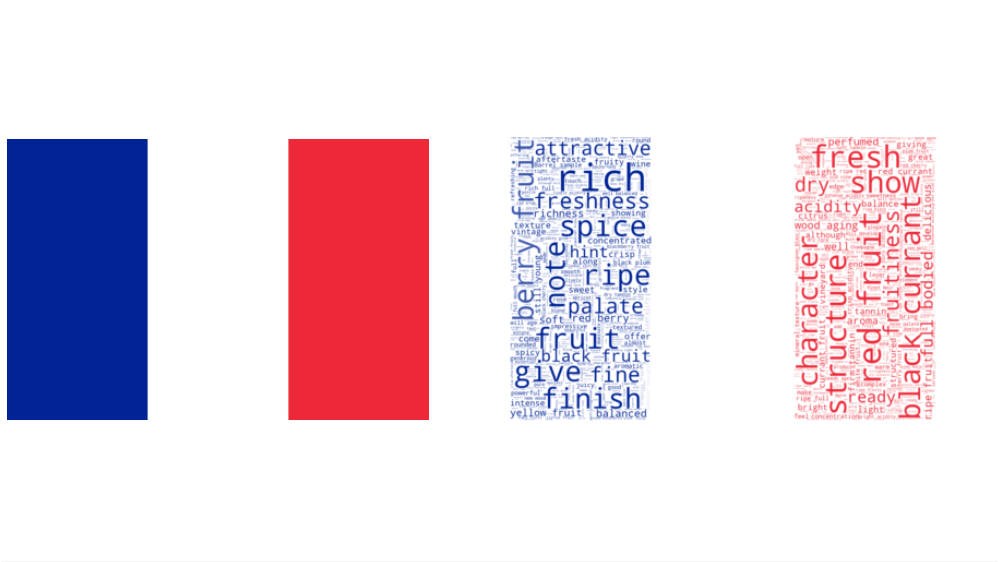
瞧!你创建了一个酒瓶形状的wordcloud!似乎葡萄酒描述中经常提到黑樱桃, 水果风味和葡萄酒的浓郁特征。现在, 让我们仔细看看每个国家/地区的评论, 并使用每个国家/地区的国旗来绘制单词云。为了你容易想象, 这是你很快将创建的一个示例:

按照颜色模式创建Wordcloud
你可以合并五个拥有最多葡萄酒的国家的所有评论。要查找这些国家/地区, 你可以查看标绘国家/地区与上方的葡萄酒数量之间的关系, 也可以使用上方的组来查找每个国家/地区(每个组)的观测数量, 并使用参数ascending = False进行sort_values()进行排序下降。
country.size().sort_values(ascending=False).head()
country
US          54504
France      22093
Italy       19540
Spain        6645
Portugal     5691
dtype: int64
因此, 现在你有5个热门国家/地区:美国, 法国, 意大利, 西班牙和葡萄牙。你可以通过将你选择的号码放入内部head()来更改国家/地区的数量, 如下所示
country.size().sort_values(ascending=False).head(10)
country
US           54504
France       22093
Italy        19540
Spain         6645
Portugal      5691
Chile         4472
Argentina     3800
Austria       3345
Australia     2329
Germany       2165
dtype: int64
目前, 仅5个国家就足够了。
要获得每个国家/地区的所有评论, 你可以使用”” .join(list)语法将所有评论进行合并, 该语法将所有元素连接到以空格分隔的列表中。
# Join all reviews of each country:
usa = " ".join(review for review in df[df["country"]=="US"].description)
fra = " ".join(review for review in df[df["country"]=="France"].description)
ita = " ".join(review for review in df[df["country"]=="Italy"].description)
spa = " ".join(review for review in df[df["country"]=="Spain"].description)
por = " ".join(review for review in df[df["country"]=="Portugal"].description)
然后, 如上所述创建wordcloud。你可以将创建和生成的两个步骤组合在一起, 如下所示。使用WordCloud库中的ImageColorGenerator函数绘制云之前, 将完成颜色映射。
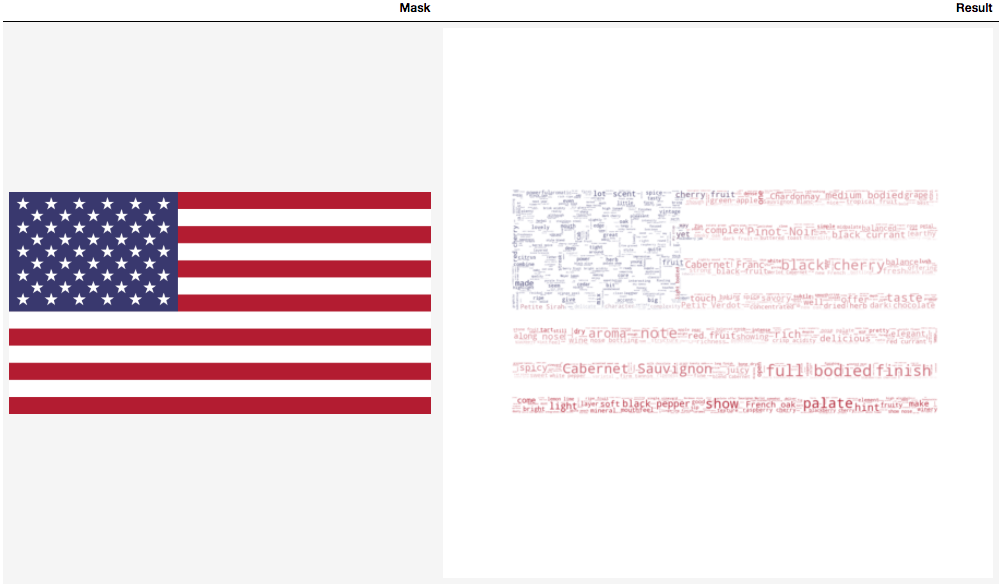
# Generate a word cloud image
mask = np.array(Image.open("img/us.png"))
wordcloud_usa = WordCloud(stopwords=stopwords, background_color="white", mode="RGBA", max_words=1000, mask=mask).generate(usa)

# create coloring from image
image_colors = ImageColorGenerator(mask)
plt.figure(figsize=[7, 7])
plt.imshow(wordcloud_usa.recolor(color_func=image_colors), interpolation="bilinear")
plt.axis("off")

# store to file
plt.savefig("img/us_wine.png", format="png")

plt.show()
看起来不错!现在, 让我们再重复一次法国的评论。
# Generate a word cloud image
mask = np.array(Image.open("img/france.png"))
wordcloud_fra = WordCloud(stopwords=stopwords, background_color="white", mode="RGBA", max_words=1000, mask=mask).generate(fra)

# create coloring from image
image_colors = ImageColorGenerator(mask)
plt.figure(figsize=[7, 7])
plt.imshow(wordcloud_fra.recolor(color_func=image_colors), interpolation="bilinear")
plt.axis("off")

# store to file
plt.savefig("img/fra_wine.png", format="png")

#plt.show()
请注意, 绘图后应保存图像, 以使单词云具有所需的颜色模式。
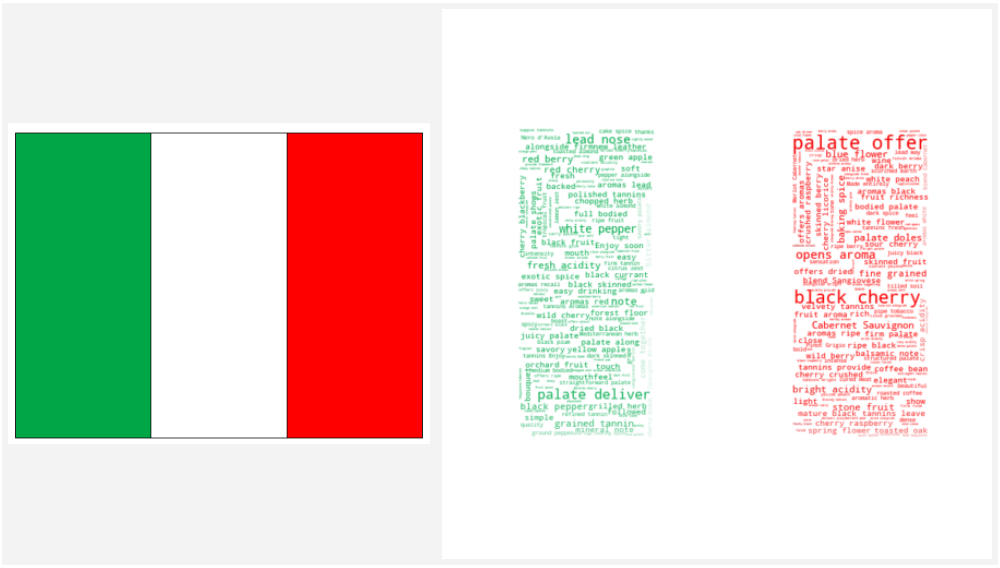
# Generate a word cloud image
mask = np.array(Image.open("img/italy.png"))
wordcloud_ita = WordCloud(stopwords=stopwords, background_color="white", max_words=1000, mask=mask).generate(ita)

# create coloring from image
image_colors = ImageColorGenerator(mask)
plt.figure(figsize=[7, 7])
plt.imshow(wordcloud_ita.recolor(color_func=image_colors), interpolation="bilinear")
plt.axis("off")

# store to file
plt.savefig("img/ita_wine.png", format="png")

#plt.show()

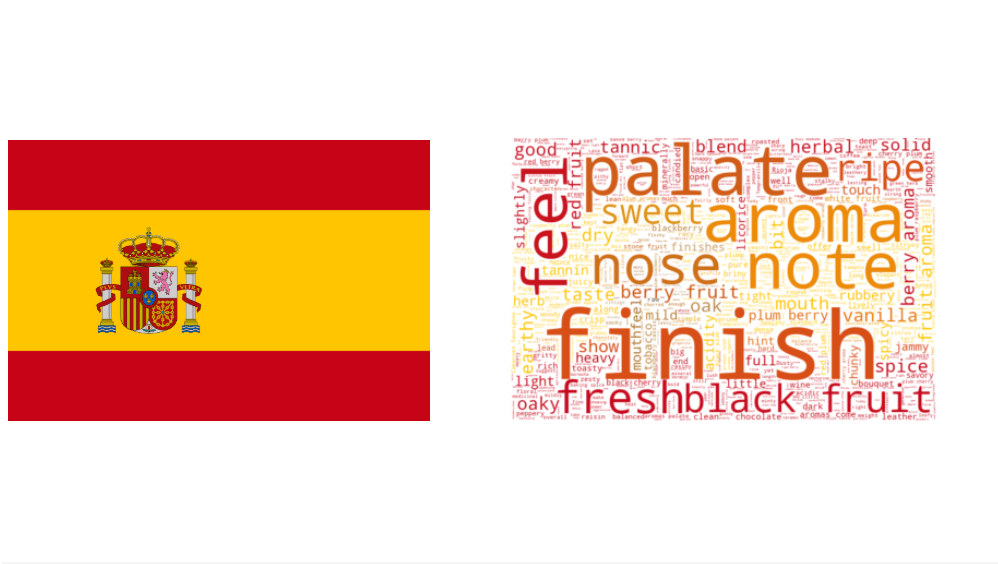
继意大利之后是西班牙:
# Generate a word cloud image
mask = np.array(Image.open("img/spain.png"))
wordcloud_spa = WordCloud(stopwords=stopwords, background_color="white", max_words=1000, mask=mask).generate(spa)

# create coloring from image
image_colors = ImageColorGenerator(mask)
plt.figure(figsize=[7, 7])
plt.imshow(wordcloud_spa.recolor(color_func=image_colors), interpolation="bilinear")
plt.axis("off")

# store to file
plt.savefig("img/spa_wine.png", format="png")
#plt.show()

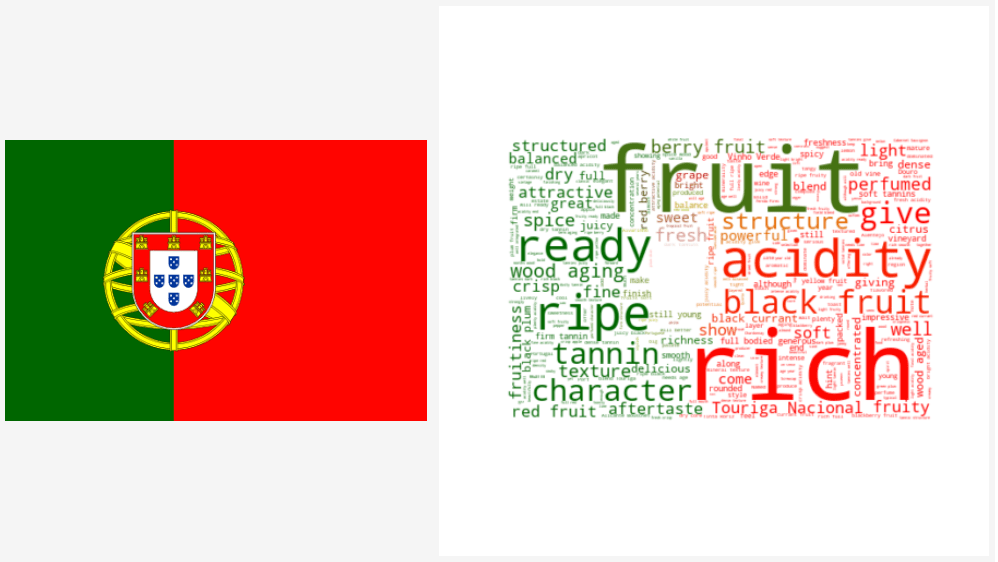
最后, 葡萄牙:
# Generate a word cloud image
mask = np.array(Image.open("img/portugal.png"))
wordcloud_por = WordCloud(stopwords=stopwords, background_color="white", max_words=1000, mask=mask).generate(por)

# create coloring from image
image_colors = ImageColorGenerator(mask)
plt.figure(figsize=[7, 7])
plt.imshow(wordcloud_por.recolor(color_func=image_colors), interpolation="bilinear")
plt.axis("off")

# store to file
plt.savefig("img/por_wine.png", format="png")
#plt.show()

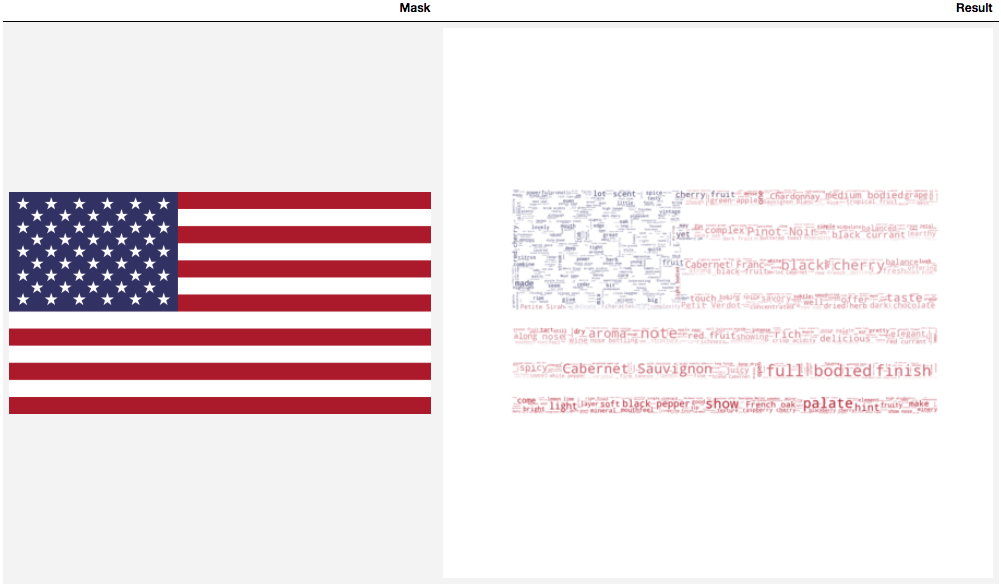
最终结果在下表中, 以比较掩码和wordcloud。哪一个是你的最爱?

恭喜你!
你做到了!你已经学习了几种绘制WordCloud的方法, 这些方法有助于可视化任何文本分析。你还将学习如何使用你选择的任何颜色将云遮盖成任何形状。如果你想练习技能, 请考虑srcmini的项目:机器学习中最热门的主题
如果你想与我联系, 可以给我发电子邮件dqvu.ubc@gmail.com或通过LinkedIn与我联系。
如果你有兴趣了解有关自然语言处理的更多信息, 请参加我们的Python自然语言处理基础知识课程。
评论前必须登录!
注册