 srcmini
本文概述
在本教程中, 我将使用Microsoft Face API通过React Native创建人脸识别应用。我将假设你已经构建了一个React Native应用程序, 因此不会涵盖所有代码部分。如果你不熟悉React Native, 建议你阅读我以前的教程“使用React Native构建Android应用程序”。你可以在Github上找到本教程的应用程序的完整源代码。
获取API密钥
第一步是从Microsoft Azure获取API密钥。如果你不了解Microsoft Azure, 那就是Microsoft的云计算平台。如果你还没有Microsoft Live帐户, 请注册一个。对于那些不熟悉Azure的人, 请注册以免费试用。只要你不超过为Face API的免费层分配的HTTP请求, 这将使你有30天的时间免费使用Azure。如果你之前已经创建过帐户, 则可以使用现有的订阅计划。如果你没有这样的服务, 请选择即用即付计划, 这样就可以只按使用量付费。
注册帐户后, 请登录并单击屏幕顶部的搜索图标, 然后搜索“认知服务”。在显示的下拉列表中, 单击Cognitive Services帐户(预览), 你应该看到以下屏幕:

单击添加, 将显示以下屏幕:

填写必填字段。你可以输入所需的任何名称作为帐户名, 如果你是新用户, 则订阅应为“免费试用”, 如果你是现有用户, 则订阅应为“现收现付”。资源组可以是你想要的任何名称。资源组位置应该是当前位置附近的服务器, 但是如果需要, 可以坚持使用默认值。对于API类型, 选择“ Face API”, 然后选择“免费”作为定价层。这样可以确保你不花任何钱。填写完所有内容后, 请点击“创建”按钮, 然后等待资源完成部署。
部署资源后, 单击左侧工具栏中的“所有资源”菜单。你创建的资源应在此处列出, 否则刷新页面。单击资源, 你将看到以下屏幕:
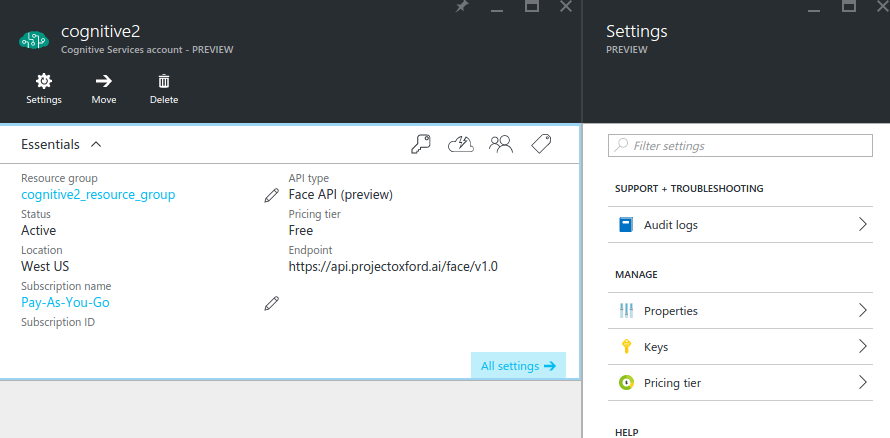
单击密钥以查看API密钥。请注意其中一个键, 因为稍后在向API发出请求时将使用它们。
构建应用
你要构建的应用将执行以下操作:
- 创建面孔列表: A face list is a container for faces. Think of it as a database for a group of related faces.
- 将面孔添加到面孔列表: The face list is a container, you need to add photos which contain a single face. These will be used for comparison later.
- 获得相似的面孔: Used for getting a similar face from the face list based on a face detected on a photo.
流程是首先创建一个面孔列表, 向其中添加面孔照片, 然后根据提供的照片获得相似面孔的列表。
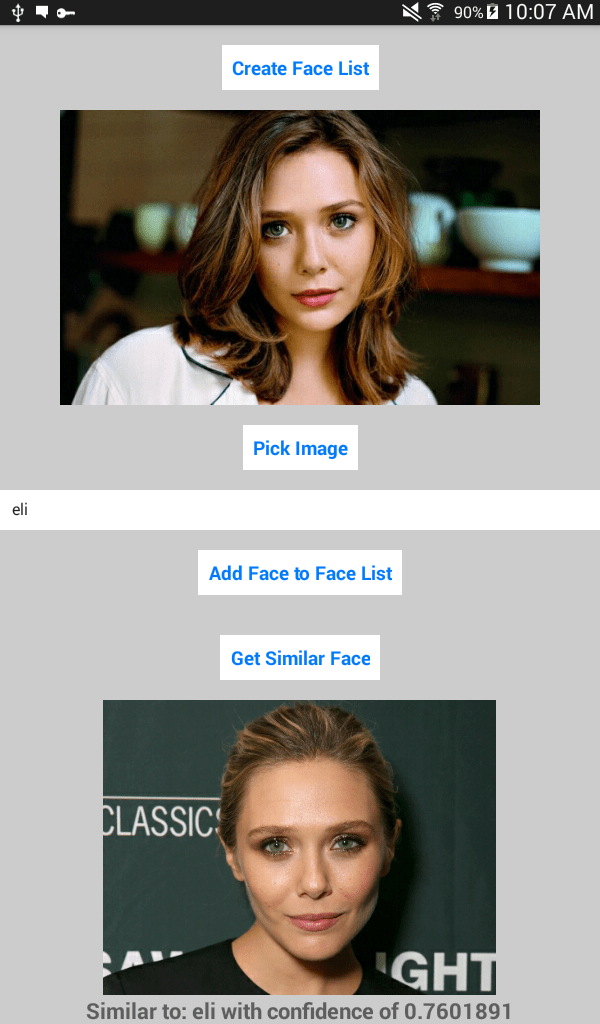
用户上传照片并按下按钮以获取相似面孔后, 该应用的外观如下:
安装依赖项
首先创建一个新的React Native项目:
react-native init RNSimilar
注意:本教程使用的是React Native 0.25.1版本。 React Native项目进展很快, 因此, 在撰写本文时, 如果已经有更高版本可用, 则该版本的React Native可能会失去使用的依赖项。如果你稍后再阅读, 建议你使用rninit, 它是React Native CLI工具的替代方法, 可让你安装特定版本的React Native。你可以使用以下命令在全局范围内安装它:
npm install -g rninit
安装后, 你可以使用以下命令创建一个新的React Native项目:
rninit init RNSimilar --source react-native@0.25.1
这将安装React Native版本0.25.1和React版本0.14.8。
在RNSimilar文件夹中导航, 打开package.json, 你应该看到以下内容:
{
  "name": "RNSimilar", "version": "0.0.1", "private": true, "scripts": {
    "start": "react-native start"
  }, "dependencies": {
    "react": "^0.14.8", "react-native": "^0.25.1"
  }
}
在react-native下面添加以下内容:
"react-native-button": "^1.6.0", "react-native-fetch-blob": "^0.4.0", "react-native-image-picker": "^0.18.15"
运行npm install以安装刚添加的模块。
你可以使用react-native-button依赖关系创建按钮, 使用react-native-image-picker选择用户相册(或设备相机)中的图像, 并使用react-native-fetch-blob发送所选图像的斑点API。
接下来, 全局安装React Native软件包管理器:
npm install rnpm -g
安装完成后, 即使你仍位于项目的根目录下, 也可以运行rnpm link自动配置项目以添加必要的android权限, 并链接文件以使第三方模块正常工作。
入口点文件
打开index.android.js并将默认代码替换为以下代码:
import React, { Component } from 'react';
import {
  AppRegistry, StyleSheet, View
} from 'react-native';

import SimilarFaces from './components/SimilarFaces';

const image_picker_options = {
  title: 'Select Photo', takePhotoButtonTitle: 'Take Photo...', chooseFromLibraryButtonTitle: 'Choose from Library...', cameraType: 'back', mediaType: 'photo', maxWidth: 480, quality: 1, noData: false, };

//the API Key that you got from Microsoft Azure
const api_key = 'YOUR FACE API KEY';

class RNSimilar extends Component {

  render() {
    return (
      <View style={styles.container}>
        <SimilarFaces imagePickerOptions={image_picker_options} apiKey={api_key} />
      </View>
    );
  }

}

const styles = StyleSheet.create({
  container: {
    flex: 1, justifyContent: 'center', alignItems: 'center', backgroundColor: '#ccc', }
});

AppRegistry.registerComponent('RNSimilar', () => RNSimilar);
分解上面的代码。首先, 你要导入Samefaces组件, 在其中可以找到大多数应用程序逻辑。
import SimilarFaces from './components/SimilarFaces';
声明图像选择器将使用的选项。这些基本上都很清楚, 因此我在这里不再解释。你可以访问该组件的Github存储库, 以查看可以提供哪些其他选项。
const image_picker_options = {
  title: 'Select Photo', takePhotoButtonTitle: 'Take Photo...', chooseFromLibraryButtonTitle: 'Choose from Library...', cameraType: 'back', mediaType: 'photo', maxWidth: 480, quality: 1, noData: false, };
从早期添加API密钥:
const api_key = 'YOUR FACE API KEY';
在主应用程序组件内, 使用你将很快创建的SameFaces组件。传递图像选择器选项和API密钥作为属性, 以便你可以在组件内部访问它们。
class RNSimilar extends Component {

  render() {
    return (
      <View style={styles.container}>
        <SimilarFaces imagePickerOptions={image_picker_options} apiKey={api_key} />
      </View>
    );
  }

}
相似面组件
创建一个components / SimilarFaces.js文件并添加以下内容:
import {
  AppRegistry, StyleSheet, Text, View, Image, TextInput, ScrollView
} from 'react-native';

import React, { Component } from 'react';

import NativeModules, { ImagePickerManager } from 'NativeModules';
import Button from 'react-native-button';

import Requestor from '../lib/Requestor';

let facelist_id = 'facelist_005';
let facelist_data = {
  name: 'My 5th facelist'
};

let face_api_base_url = 'https://api.projectoxford.ai';

export default class SimilarFaces extends Component {
  constructor(props) {
    super(props);
    this.state = {
      name: '', photo_style: {
            width: 480, height: 480
        }, photo: null, similar_photo: null, message: ''
    };
  }

  render() {
    return (
      <ScrollView>
        <View style={styles.container}>
          <Button
            containerStyle={styles.button}
            onPress={this._createFaceList.bind(this)}>
            Create Face List
          </Button>

          <Image
            style={this.state.photo_style}
            source={this.state.photo}
            resizeMode={"contain"}
          />

          <Button
            containerStyle={styles.button}
            onPress={this._pickImage.bind(this)}>
            Pick Image
          </Button>

          <TextInput
            style={styles.text_input}
            onChangeText={this._changeName.bind(this)}
            value={this.state.name}
            placeholder={"name"}
          />

            <Button
                containerStyle={styles.button}
                onPress={this._addFaceToFaceList.bind(this)}>
                Add Face to Face List
            </Button>

            <Button
                containerStyle={styles.button}
                onPress={this._getSimilarFace.bind(this)}>
                Get Similar Face
            </Button>

          <Image
            style={this.state.photo_style}
            source={this.state.similar_photo}
            resizeMode={"contain"}
          />

          <Text style={styles.message}>{this.state.message}</Text>
        </View>
      </ScrollView>

    );
  }

  _changeName(text) {
    this.setState({
      name: text
    });
  }

  _pickImage() {

    ImagePickerManager.showImagePicker(this.props.imagePickerOptions, (response) => {

      if(response.error){
        alert('Error getting the image. Please try again.');
      }else{

        let source = {uri: response.uri};

        this.setState({
          photo_style: {
            width: response.width, height: response.height
          }, photo: source, photo_data: response.data
        });

      }
    });

  }

  _createFaceList() {

    Requestor.request(
      face_api_base_url + '/face/v1.0/facelists/' + facelist_id, 'PUT', this.props.apiKey, JSON.stringify(facelist_data)
    )
    .then(function(res){
      alert('Face List Created!');
    });

  }

  _addFaceToFaceList() {

    var user_data = {
      name: this.state.name, filename: this.state.photo.uri
    };

    Requestor.upload(
      face_api_base_url + '/face/v1.0/facelists/' + facelist_id + '/persistedFaces', this.props.apiKey, this.state.photo_data, {
        userData: JSON.stringify(user_data)
      }
    )
    .then((res) => {

      alert('Face was added to face list!');

    });

  }

  _getSimilarFace() {

    Requestor.upload(
      face_api_base_url + '/face/v1.0/detect', this.props.apiKey, this.state.photo_data
    )
    .then((facedetect_res) => {

      let face_id = facedetect_res[0].faceId;

      let data = {
        faceId: face_id, faceListId: facelist_id, maxNumOfCandidatesReturned: 2
      }

      Requestor.request(
        face_api_base_url + '/face/v1.0/findsimilars', 'POST', this.props.apiKey, JSON.stringify(data)
      )
      .then((similarfaces_res) => {

        let similar_face = similarfaces_res[1];

        Requestor.request(
          face_api_base_url + '/face/v1.0/facelists/' + facelist_id, 'GET', this.props.apiKey
        )
        .then((facelist_res) => {

          let user_data = {};
          facelist_res['persistedFaces'].forEach((face) => {
            if(face.persistedFaceId == similar_face.persistedFaceId){
              user_data = JSON.parse(face.userData);
            }
          });

          this.setState({
            similar_photo: {uri: user_data.filename}, message: 'Similar to: ' + user_data.name + ' with confidence of ' + similar_face.confidence
          });

        });

      });

    });

  }
}

const styles = StyleSheet.create({
  container: {
    flex: 1, alignItems: 'center'
  }, button: {
    padding: 10, margin: 20, height: 45, overflow: 'hidden', backgroundColor: 'white'
  }, text_input: {
    height: 40, borderColor: 'gray', borderWidth: 1, backgroundColor: '#FFF'
  }, message: {
    fontSize: 20, fontWeight: 'bold'
  }
});

AppRegistry.registerComponent('SimilarFaces', () => SimilarFaces);
分解上面的代码。首先, 你具有通常的导入语句:
import {
  AppRegistry, StyleSheet, Text, View, Image, TextInput, ScrollView
} from 'react-native';
包括react-native-button和react-native-image-picker:
import NativeModules, { ImagePickerManager } from 'NativeModules';
import Button from 'react-native-button';
包括用于向Face API发出HTTP请求的自定义库。你稍后将在“请求者”部分中创建此代码。
import Requestor from '../lib/Requestor';
声明创建面部列表, 将面部添加到面部列表并获得相似面部时使用的数据。 facelist_id是面部列表的唯一ID, facelist_data是你要赋予面部列表的描述性名称。你可以根据需要更改这些值。
let facelist_id = 'facelist_003';
let facelist_data = {
  name: 'My facelist'
};
添加Face API的基本URL:
let face_api_base_url = 'https://api.projectoxford.ai';
添加将在组件内部使用的数据的默认值:
constructor(props) {
  super(props);
  this.state = {
    name: '', //the name of the person to add
    photo_style: { //default styling for the selected photo
      position: 'relative', width: 480, height: 480
    }, photo: null, //the source uri of the selected photo
    similar_photo: null, //the source uri of the similar photo
    message: '' //the message to display once a similar face is returned
  };
}
render方法返回应用程序的UI。其中包含用于创建面部列表的按钮, 显示用户选择的照片, 用于选择照片的按钮, 用于输入添加的人的姓名的文本输入, 用于获取相似面孔的按钮, 相似面孔的照片的按钮和自定义消息。
render() {
  return (
    <ScrollView>
      <View style={styles.container}>
        <Button
          containerStyle={styles.button}
          onPress={this._createFaceList.bind(this)}>
          Create Face List
        </Button>

        <Image
          style={this.state.photo_style}
          source={this.state.photo}
          resizeMode={"contain"}
        />

        <Button
          containerStyle={styles.button}
          onPress={this._pickImage.bind(this)}>
          Pick Image
        </Button>

        <TextInput
          style={styles.text_input}
          onChangeText={this._changeName.bind(this)}
          value={this.state.name}
          placeholder={"name"}
        />

        <Button
          containerStyle={styles.button}
          onPress={this._addFaceToFaceList.bind(this)}>
          Add Face to Face List
        </Button>

        <Button
          containerStyle={styles.button}
          onPress={this._getSimilarFace.bind(this)}>
          Get Similar Face
        </Button>

        <Image
          style={this.state.photo_style}
          source={this.state.similar_photo}
          resizeMode={"contain"}
        />

        <Text style={styles.message}>{this.state.message}</Text>
      </View>
    </ScrollView>

  );
}
_changeName函数更新用于输入人名的文本字段的新值的状态。
_changeName(text) {
  this.setState({
    name: text
  });
}
_pickImage函数允许用户从相机或图库中选择图像。这使用了react-native-image-picker库。收到响应后, 请使用拾取的图像尺寸更新图像容器的样式。还将图像的文件路径和base64表示形式设置为状态。这样, 你可以在以后将面孔添加到面孔列表或获取相似面孔时使用它。
_pickImage() {

  ImagePickerManager.showImagePicker(this.props.imagePickerOptions, (response) => {

    if(response.error){
      alert('Error getting the image. Please try again.');
    }else{

      let source = {uri: response.uri};

      this.setState({
        photo_style: {
          width: response.width, height: response.height
        }, photo: source, //file path of the image
        photo_data: response.data //base64 representation of the image
      });

    }
  });

}
接下来是_createFaceList函数, 该函数将创建新面孔列表的请求发送到Face API。 facelist_data是你之前在文件顶部附近声明的硬编码对象。
_createFaceList() {

  Requestor.request(
    face_api_base_url + '/face/v1.0/facelists/' + facelist_id, 'PUT', this.props.apiKey, JSON.stringify(facelist_data)
  )
  .then(function(res){
    alert('Face List Created!');
  });

}
_addFaceToFaceList函数将人脸数据添加到人脸列表中, 这一次使用了Requestor库中的上载函数。它将你要发送请求的URL作为其第一个参数, 将API Key作为其第二个参数, 将所选照片的base64表示作为第三个参数, 并将用户数据作为第四个参数。 userData的值将转换为字符串, 因为上载函数将其作为查询参数发送。这就是为什么你只能发送最小长度为1KB的数据的原因。
_addFaceToFaceList() {

  var user_data = {
    name: this.state.name, filename: this.state.photo.uri
  };

  Requestor.upload(
    face_api_base_url + '/face/v1.0/facelists/' + facelist_id + '/persistedFaces', this.props.apiKey, this.state.photo_data, {
      userData: JSON.stringify(user_data)
    }
  )
  .then((res) => {

    alert('Face was added to face list!');

  });

}
_getSimilarFace函数首先将请求发送到面部检测端点。这会为照片中检测到的脸部分配一个唯一的ID, 并将其连同宽度, 高度, 顶部和左侧位置一起返回, 以构建围绕检测到的脸部的盒子。但是对于本教程, 你仅使用面部ID。
_getSimilarFace() {

  Requestor.upload(
    face_api_base_url + '/face/v1.0/detect', this.props.apiKey, this.state.photo_data
  )
  .then((facedetect_res) => {

    ...

  });

}
以下是一个示例响应, 可让你大致了解正在使用的数据是什么样的:
[
    {
        "faceId": "c5c24a82-6845-4031-9d5d-978df9175426", "faceRectangle": {
            "width": 78, "height": 78, "left": 394, "top": 54
        }
    }
]
收到响应后, 从数据的第一行提取faceId。下面的代码假定照片中只有一张脸, 这就是为什么它仅提取第一行的原因。
let face_id = facedetect_res[0].faceId;
接下来, 构造一个对象, 其中包含“查找相似面孔”端点所需的数据。这包括从面部检测调用接收到的face_id, 面部API将在其中进行搜索的面部列表的ID, 以及要返回的相似面部的最大数量。在这种情况下, 坚持两个。
尽管只显示一张相似的脸, 但仍指定2, 因为指定1将返回最匹配的照片。这意味着, 如果将me.jpg和me2.jpg添加到面部列表中, 然后再次选择me.jpg以获取相似的面部, 如果仅将maxNumOfCandidatesReturned的值指定为1, 它将返回me.jpg。
如果你指定2, 然后从结果中提取第二行, 则会得到me2.jpg。反之亦然(将me2.jpg提供给相似的面孔端点将返回me.jpg)。这一切意味着你将获得第二个最接近的匹配, 因此API永远不会返回同一张照片。
let data = {
  faceId: face_id, faceListId: facelist_id, maxNumOfCandidatesReturned: 2
}
将请求发送到“查找相似的面孔”端点, 将构造的数据转换为字符串, 因为这是Face API期望的结果。
Requestor.request(
  face_api_base_url + '/face/v1.0/findsimilars', 'POST', this.props.apiKey, JSON.stringify(data) //convert data to a string
)
.then((similarfaces_res) => {

    ...

});
收到响应后, 从返回的结果中提取第二行。然后向端点发出请求以获取特定的面孔列表。这包含用户添加的所有面部数据。遍历它以查找与相似面孔端点返回的面孔具有相同面孔ID的面孔。
注意:你需要解析userData, 因为它已另存为字符串。然后, 你可以使用数据更新相似照片和包含相似面孔名称和置信度编号的消息来更新状态。置信度在0到1之间。数字越接近1, 则意味着用户提供的照片与API返回的照片属于同一个人的可能性越大。
let similar_face = similarfaces_res[1];

Requestor.request(
  face_api_base_url + '/face/v1.0/facelists/' + facelist_id, 'GET', this.props.apiKey
)
.then((facelist_res) => {

  let user_data = {};
  facelist_res['persistedFaces'].forEach((face) => {
    if(face.persistedFaceId == similar_face.persistedFaceId){
      user_data = JSON.parse(face.userData);
    }
  });

  this.setState({
    similar_photo: {uri: user_data.filename}, message: 'Similar to: ' + user_data.name + ' with confidence of ' + similar_face.confidence
  });

});
这是来自“发现相似面孔”端点的示例响应:
[
    {
        "persistedFaceId" : "015839fb-fbd9-4f79-ace9-7675fc2f1dd9", "confidence" : 0.82
    }, ...
]
添加样式:
const styles = StyleSheet.create({
  container: {
    flex: 1, alignItems: 'center'
  }, button: {
    padding: 10, margin: 20, height: 45, overflow: 'hidden', backgroundColor: 'white'
  }, text_input: {
    height: 40, borderColor: 'gray', borderWidth: 1, backgroundColor: '#FFF'
  }, message: {
    fontSize: 30, fontWeight: 'bold'
  }
});
请求者
Requestor库向Face API发出HTTP请求。创建一个lib / Requestor.js文件并添加以下内容:
import RNFetchBlob from 'react-native-fetch-blob';

module.exports = {
    upload: function(url, api_key, photo, query_params){

        var ret = [];
        for(var d in query_params){
            ret.push(encodeURIComponent(d) + "=" + encodeURIComponent(query_params[d]));
        }

        var url = url + "?" + ret.join("&");

        return RNFetchBlob.fetch('POST', url, {
            'Accept': 'application/json', 'Content-Type': 'application/octet-stream', 'Ocp-Apim-Subscription-Key': api_key
        }, photo)
        .then((res) => {
            return res.json();
        })
        .then((json) => {
            return json;
        })
        .catch(function (error) {
            console.log(error);
        });
    }, request: function(url, method, api_key, data){

        let headers = {
            'Content-Type': 'application/json', 'Ocp-Apim-Subscription-Key': api_key
        };

        let options = {
            'method': method, 'headers': headers
        };

        if(typeof data != 'undefined'){
            options.body = data;
        }

        return fetch(url, options)
        .then((res) => {
            return res.json();
        })
        .then((json) => {
            return json;
        })
        .catch(function(error){
            console.log(error);
        });
    }

}
分解上面的代码。上载功能处理所有将文件上载到Face API的HTTP请求。它使用react-native-fetch-blob库发送照片的base64表示以及Face API所需的标头信息。
upload: function(url, api_key, photo, query_params){

  if(typeof query_params != 'undefined'){
    //construct the query parameter from the query_params object
    let ret = [];
    for(let d in query_params){
      ret.push(encodeURIComponent(d) + "=" + encodeURIComponent(query_params[d]));
    }

    let url = url + "?" + ret.join("&"); //combine the query parameters with the URL
  }

  return RNFetchBlob.fetch('POST', url, {
    'Accept': 'application/json', 'Content-Type': 'application/octet-stream', 'Ocp-Apim-Subscription-Key': api_key
  }, photo)
  .then((res) => {
    return res.json();
  })
  .then((json) => {
    return json;
  })
  .catch(function (error) {
    console.log(error);
  });
},
接下来是请求方法, 该方法处理简单的HTTP请求, 例如将字符串数据发布到服务器。
request: function(url, method, api_key, data){

    let headers = {
        'Content-Type': 'application/json', 'Ocp-Apim-Subscription-Key': api_key
    };

    let options = {
        'method': method, 'headers': headers
    };

    if(typeof data != 'undefined'){
        options.body = data;
    }

    return fetch(url, options)
    .then((res) => {
        return res.json();
    })
    .then((json) => {
        return json;
    })
    .catch(function(error){
        console.log(error);
    });
}
启动应用程序
启动应用程序。你需要做的第一件事是从互联网上下载脸部照片。确保每张照片包含一张脸, 并且每个人至少应有两张照片。
下载照片后, 请将其复制到设备中, 然后运行该应用程序。
点击创建面孔列表按钮。你应该看到一条警告, 说面部列表已创建。接下来, 点击“选择图像”按钮, 然后选择其中一张照片。输入此人的姓名, 然后点击“添加面对面列表”按钮。你应该看到一条警告, 说已添加了面部。进行多次, 但要确保每个人至少有两张照片。
最后, 再次点击“选择图像”按钮, 然后选择要用于获得相似面孔的照片。选中后, 点击“获得相似的面孔”按钮。这应该返回你之前添加的那个人的照片之一, 但是返回的不是你选择的照片。
面对未来
而已!在本教程中, 你使用了Microsoft Face API。具体涵盖了人脸检测和类似人脸搜索功能。你可以使用Face API完成其他一些很酷的事情, 以下是需要研究的其他功能:
- 人脸检测: 这是获得相似面孔的先决条件,这就是为什么我没有涉及面部检测功能,如估计一个人的年龄或猜测他们的性别。你还可以确定一个人的面部特征,比如他是否戴眼镜,或者他的面部毛发。
- 人脸分组: 用于根据相似度对人脸进行分组。
- 人脸验证: 用于对两个检测到的面孔执行身份验证。你可以在你的React原生应用中使用它作为一种认证形式。用户无需输入电子邮件和密码,只需自拍即可登录。
- 人脸识别: 用于识别人脸。与类似的faces API一样,在使用它之前,必须先添加faces。
任何其他意见或问题, 请在下面让我知道。
评论前必须登录!
注册